OpenBSD on the Chromebook Pixel (2015)
The Chromebook Pixel LS (2015) has an Intel Core i7 processor (Broadwell) at 2.4 GHz, 16 GB of RAM, a 2560x1700 400-nit IPS screen (239ppi), and Intel 802.11ac wireless. It has a Kingston 64 GB flash chip, of which about 54 GB can be used by OpenBSD when dual-booting with a 1 GB Chrome OS partition.
Table of Contents
This guide is rather verbose because I explain each part of the process so you can understand how it works, instead of just blindly copying random commands from mailing lists and forums (most of which are for different/older Chromebooks).
The Chromebook Pixel ships with a working SeaBIOS (RW_LEGACY) ROM region from the factory, so there is no need to download or flash any other ROM images.
Note: everything here can be done on a fresh Chromebook with no Google account set up.
Enabling Developer Mode
At the initial Chrome welcome screen, press Escape+F3(Refresh)+Power and the machine will reboot. Press Control+D then Enter at the scary warning screen, then Control+D again to transition into Developer Mode which will wipe out your locally-stored user data.
After the state partition is formatted, it will reboot to the scary warning screen.
Press Control+D to continue booting into Chrome OS.
At the Chrome welcome screen, hit Control+Alt+F2(Forward) to get to a console, and login as chronos.
Enable legacy booting (to SeaBIOS) so we can boot to OpenBSD with sudo crossystem dev_boot_legacy=1.
Note: dev_boot_usb is not needed since that's for non-legacy (Chrome OS) booting from USB.
If you have already unscrewed the write-protect screw to be able to change the default boot flags, you can jump ahead to do that now.
Booting OpenBSD Installer
Once you have enabled legacy booting, you can boot to SeaBIOS with Control+L at the boot screen which will boot the OpenBSD media from your USB stick or SD card.
Since SeaBIOS only supports VGA text emulation (by drawing on the framebuffer setup by Coreboot) in 16-bit real mode, once the OpenBSD bootloader loads the kernel and switches into protected mode, you would not see any text on the screen (unless/until inteldrm is loaded, which is not on the install media).
Support for drawing an early console on Coreboot's framebuffer was added to efifb (which is present on the install media) between OpenBSD 5.9 and 6.0, so make sure you install a version 6.0 or higher.
Repartitioning
Chrome OS uses an encrypted /home mounted from the large STATE partition mounted at /mnt/stateful_partition.
Rather than just change it to an OpenBSD partition, we'll shrink it and create another OpenBSD partition.
This will allow the machine to properly boot into Chrome OS for future firmware upgrades and knob twiddling.
From the OpenBSD install prompt, break out to a shell and fdisk -e sd0.
The first partition listed is actually the last on the disk, and it's shown as a "DOS FAT-12" disk even though it's actually formatted as ext4.
Shrink it with e 0 and make its size 1G or however large you want to give up for Chrome OS.
Create a new partition with e 12 (or whichever partition number is next), make its type a6, starting at partition 0's start+size, and make use the rest of the disk.
Setting Up Encrypted softraid
Edit the disklabel with disklabel -E sd0, add an a partition with type RAID, making sure the offset and size match what you created earlier with fdisk, then w and q.
Initialize the new encrypted disk with bioctl -cC -l /dev/sd0a softraid0 and enter a new passphrase.
Then install to proceed with the installation, installing to the new disk that just appeared when the softraid0 device was brought up.
Note that the iwm0 wireless device won't work during installation because there is no firmware package, so try a USB ethernet device that doesn't need firmware for now.
The two USB-C ethernet devices I've tried both showed up as cdce devices which work fine in OpenBSD during installation.
OpenBSD Bootloader
At the end of the installation, you'll probably see a message that installboot couldn't find an OpenBSD partition.
This is because the Chromebook uses a GPT disk layout for Chrome OS's bootloader, but SeaBIOS requires an MBR to boot legacy disks.
Since the kernel and thus installboot sees the disk as GPT, it will want to install its EFI bootloader and not re-write the MBR.
(Or, it sees it as an MBR disk with just one EE partition spanning most of the disk, with no OpenBSD partition present.)
To work around this, you need to edit the MBR on the disk while preserving the GPT, and define an OpenBSD partition in the MBR with the same start/size as the partition already in the GPT label. Some 3rd party tools like GPT fdisk support this by creating a "hybrid MBR".
Once the MBR contains an OpenBSD partition, the OpenBSD kernel should see it as an MBR disk, allowing installboot to work.
You can fetch a statically linked binary of gdisk while still at the installer root prompt (the ftp binary on the ramdisk does not support SSL):
# ftp -o /mnt/sbin/gdisk http://insecure.jcs.org/tmp/gdisk
# chmod +x /mnt/sbin/gdisk
# /mnt/sbin/gdisk /dev/sd0c
From the gdisk command prompt, r to enter recovery/transformation mode, and then h to make a hybrid MBR.
Add partition 13 (your OpenBSD partition) and say y to the prompt about adding ee first.
Press enter to accept a6 as the partition type, and y to be bootable.
Enter n to protect more partitions.
Press o to see your new hybrid MBR which should contain your a6 OpenBSD partition.
w to write table and exit.
Now write a new MBR with fdisk -u sd0 and then installboot -vr /mnt sd1 to target the softraid disk, which will then find the sd0 disk and hopefully write your MBR.
If you see a successful /mnt/usr/mdec/biosboot will be written at sector ... line, you should be good to go.
reboot and hit Control+L at the splash screen, and SeaBIOS should find the OpenBSD bootloader.
Chrome OS
Once OpenBSD is installed, you can go back to Chrome OS by pressing Control+D at the boot screen.
Upon first boot after re-sizing the STATE partition, Chrome OS will repair itself by re-formatting that ext4 partition and re-creating the encrypted /home.
You should then go back to the chronos shell and set a password with sudo chromeos-setdevpasswd since any previous password will have been erased when Chrome OS re-initialized its STATE partition.
If you got a different screen saying that Chrome OS is damaged and must be restored, your GPT partition table might be screwed up, or may have just lost the proprietary attributes set on the KERN-* partitions which tell Chrome OS which kernel to boot (as only one should be active at a time).
If you proceed, you will lose your OpenBSD partition.
You can try to repair these attributes with the gdisk tool mentioned earlier.
Use the x and a commands to set the following attributes:
Partition 2 (KERN-A): set 56 and 48 for      0101000000000000
Partition 4 (KERN-B): set 52, 53, 54, 55 for 000F000000000000
Partition 6 (KERN-C): set 52, 53, 54, 55 for 000F000000000000
After writing out the GPT label, booting back into Chrome OS should work properly.
Defaulting to OpenBSD
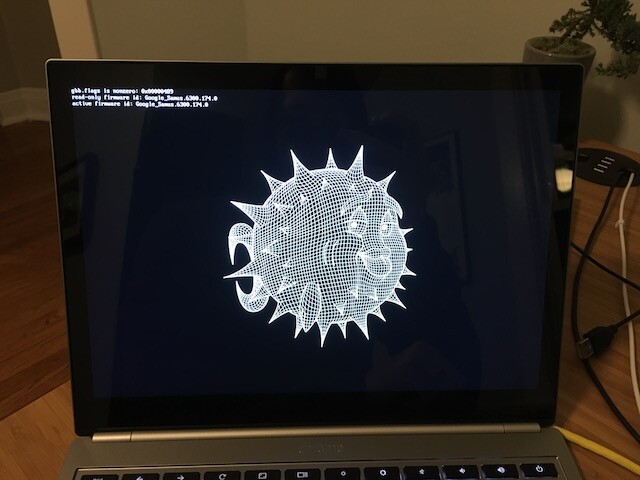
By default, the Chromebook will boot to the scary "developer mode" splash screen and wait. If you don't press Control+D to boot to Chrome OS or Control+L to boot SeaBIOS within about 30 seconds, it will beep (very loudly) at you.
To boot SeaBIOS/OpenBSD by default, and do it much quicker, you can change some GBB flags in the firmware through Chrome OS (good thing you kept that Chrome OS partition).
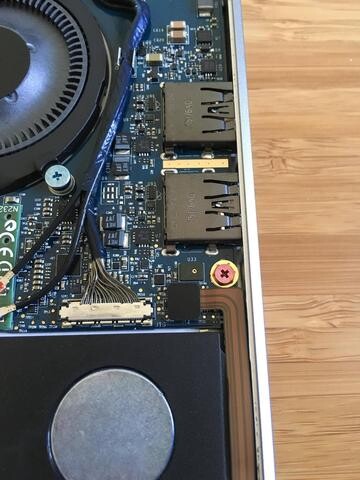
Doing this requires that flashrom have write access to the normally-write-protected area of the device, which requires physically opening your Pixel and removing the write-protect screw:
- Power off and unplug the Pixel
- Remove the rubber strips from the underside carefully (if you stretch them out, they won't go back on smoothly) and remove all 16 screws
- The lid should easily lift off (there are no clips)
- Remove the pink write-protect screw located on the right-hand side near the USB ports, along with its washer
Now you can disable write protection from within Chrome OS.
Open the Pixel's lid and it should power on automatically.
Press Control+D at the splash screen to boot to Chrome OS, then switch to chronos.
Run flashrom --wp-disable to disable flash protection.
You can now set the GBB flags to enable GBB_FLAG_DEV_SCREEN_SHORT_DELAY, GBB_FLAG_FORCE_DEV_SWITCH_ON, GBB_FLAG_FORCE_DEV_BOOT_LEGACY, and GBB_FLAG_DEFAULT_DEV_BOOT_LEGACY, which will automatically boot SeaBIOS after a short time:
sudo /usr/share/vboot/bin/set_gbb_flags.sh 0x489
Before buttoning everything back up, test that opening the Pixel's lid displays the splash screen for only a couple seconds before booting to SeaBIOS automatically. To shorten the SeaBIOS timeout, keep reading.
Modifying the Splash Screen
The Chrome EC (or video BIOS?) initializes the backlight of the screen to 100% upon boot. Normally it would quickly boot to Linux which would then adjust it down to a non-blinding level, but since it now displays its scary developer mode warning for a few seconds, this bright white screen at 100% screen brightness can be very disorienting, especially if you were just working in the console with a black background.
To get around this, you can modify the bitmaps and layout in vboot to display something else, or just force it to fallback to a simple text display.
To add custom bitmaps and layout, you'll need to compile
vboot
to get a bmpblk_utility binary built (this can be done on another machine,
since you just need to copy the final bitmap file back to the Pixel).
If you don't want to do all of that, you can instead skip this section and opt for a
simple line of text.
Extract your current GBB on the Pixel:
sudo flashrom -i GBB:/tmp/gbb.rom -r
Then extract the bitmap block from it:
sudo gbb_utility --bmpfv=/tmp/bitmaps /tmp/gbb.rom
Copy the /tmp/bitmaps file to your other machine with bmpblk_utility compiled
(either via USB key or scp).
On your other machine, extract the bitmap blob (referenced by
/path/to/your/bitmaps here) to a directory where all of the individual .bmp
files and the config.yml file will be stored:
cd vboot
./build/utility/bmpblk_utility -x -d ~/gbb-images /path/to/your/bitmaps
Look in ~/gbb-images and edit individual files, or just add a new one.
For my Pixel shown above, I created a new bitmap in that directory called
openbsd.bmp that was 1280x850.
(Note: when saving BMP files in Gimp, make sure the
"do not write color space information" option is checked.)
Edit the config.yml file, add openbsd.bmp to the images: hash, then edit
scr_0_0 to just show that one bitmap at 0,0.
The relevant lines will look something like this:
[...]
   img_00067ff4: img_00067ff4.bmp  # 295x35  1118/11438  tag=0 fmt=1
   openbsd: openbsd.bmp
screens:
  scr_0_0:
     - [0, 0, openbsd]
  scr_0_1:
[...]
Now re-assemble a new bitmaps file with everything in your ~/gbb-images directory:
cd ~/gbb-images
~/vboot/build/utility/bmpblk_utility -c config.yaml -z 2 /path/to/your/new_bitmaps
Copy your new_bitmaps file back to your Pixel, put it back in the GBB, and flash
it:
sudo gbb_utility -s --bmpfv=/tmp/new_bitmaps /tmp/gbb.rom
sudo flashrom -i GBB:/tmp/gbb.rom -w
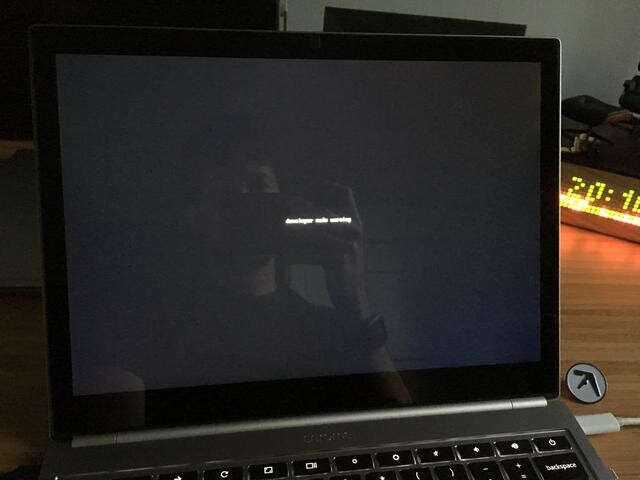
Removing the Splash Screen
A quicker option to remove the blinding white background that doesn't involve compiling anything is to just remove all of the bitmaps from the GBB. vboot will fallback to displaying a simple line of text ("developer mode warning") centered on a black background which is easy on the eyes, even at 100% brightness:
Extract the GBB:
sudo flashrom -i GBB:/tmp/gbb.rom -r
Then create a zero-length file and store it as the bmpfv in the GBB:
touch /tmp/null-images
sudo gbb_utility -s --bmpfv=/tmp/null-images /tmp/gbb.rom
Then write the GBB region back to the ROM:
sudo flashrom -i GBB:/tmp/gbb.rom -w
Speeding Up SeaBIOS
By default, SeaBIOS will wait 2.5 seconds at its "Press ESC for boot menu." screen
before continuing to boot OpenBSD, which can get annoying.
To shorten this timeout without recompiling SeaBIOS, you can adjust the value in
the etc/boot-menu-wait virtual file in the SeaBIOS CBFS.
The SeaBIOS CBFS is contained inside of the main ROM at the RW_LEGACY region
(which you can see by running fmap_decode /tmp/flash.rom to dump the entire FMAP
table of the ROM) and is separate from the Coreboot CBFS.
To read the SeaBIOS CBFS and write it to a file:
sudo flashrom -i RW_LEGACY:/tmp/rw_legacy.rom -r
You should now have a /tmp/rw_legacy.rom file that is only 2 megabytes.
Next, you'll need cbfstool from Coreboot to make changes to the CBFS file.
This tool is not shipped with Chromebooks, but you can download a binary from my
website or compile it yourself from
coreboot.
wget -O /tmp/cbfstool https://jcs.org/tmp/cbfstool
chmod +x /tmp/cbfstool
Now run cbfstool on the rw_legacy.rom file and make sure you can see its
layout, which should contain at least a few entries.
/tmp/cbfstool /tmp/rw_legacy.rom print
Most likely there will be an existing etc/boot-menu-wait entry, so you'll need to
delete it first, then add a new entry with your desired timeout in milliseconds.
/tmp/cbfstool /tmp/rw_legacy.rom remove -n etc/boot-menu-wait
/tmp/cbfstool /tmp/rw_legacy.rom add-int -i 1000 -n etc/boot-menu-wait
Now you can write the rw_legacy.rom file back into the RW_LEGACY region of the
ROM.
sudo flashrom -i RW_LEGACY:/tmp/rw_legacy.rom -w
For good measure, take a full backup of the entire ROM and store it somewhere safe.
sudo flashrom -r /tmp/final.rom
Note: if you should ever want to go back to the original firmware with original splash screen images and timeouts, you can just extract and re-flash the original firmware (after re-applying GBB flags to continue booting OpenBSD):
sudo chromeos-firmwareupdate --sb_extract /tmp
sudo /usr/share/vboot/bin/set_gbb_flags.sh -f /tmp/bios.bin 0x489
sudo flashrom -w /tmp/bios.bin
- I tried modifying the bitmaps and putting them back into the ROM, but it didn't seem to work (vboot just shows the "developer mode warning" text).
I'm not sure if the bitmap files need to be in any particular format (other than what GIMP produced when re-saving the
img_00006430.bmpfile). This can be done by extracting the bitmap block from a ROM withgbb_utility -g --bmpfv=bitmaps bios.bin, then compilingvboot, running./build/utilty/bmpblk_utility -x bitmapsto extract the bitmap block and get a huge number of.bmpfiles and aconfig.yamlfile, editing the bitmaps, then reassembling with./build/utility/bmpblk_utility -z 2 -c config.yaml /tmp/newbitmaps, and writing the new block to the ROM withgbb_utility -s --bmpfv=/tmp/newbitmaps bios.bin. </sub>
Device Support
Status is relative to OpenBSD-current.
| Component | Works? | Notes |
|---|---|---|
| Ambient light sensor | Yes | Supported by my new acpials driver and the lux value is readable via sysctl hw.sensors.acpials0.illuminance0. |
| Audio | No | Realtek RT5677CE over I2C and an RT5677AA over SPI, not supported on OpenBSD. |
| Bluetooth | No | Shows up as a ugen device, but OpenBSD does not support Bluetooth. |
| Keyboard backlight | Yes | Supported by my new acpicbkbd driver, which requires a post-6.0 change to acpiec to avoid trying to enter burst mode on the Chrome EC, which does not support it. Keyboard backlight can be adjusted with wsconsctl keyboard.backlight. |
| Lightbar | Yes | Supported by my new chromeec driver that is in development, which facilitates communication with the Chrome EC to talk to the lightbar (among other devices). |
| Suspend/resume | Yes | Made possible by my new acpitpm driver, which is a minimal driver that tells the TPM chip to save its state upon system suspend, otherwise the system will just reboot upon resume if the TPM re-initialization fails. |
| SD card slot | Yes | Device show up as a umass USB device when cards are inserted. |
| Touchpad/touchscreen | Yes | Both supported by my new iatp driver for the Atmel maXTouch over I2C. Touchpad provides two-finger scrolling and other things through the xorg-input-synaptics driver. |
| USB | Yes | USB 3 and USB-C ports work fine for charging (sysctl hw.sensors.acpiac0) and peripheral access. USB-C tested with a Kanex USB-C Ethernet device which works via the cdce driver. |
| Video | Yes | As of OpenBSD 6.0, the efifb driver will provide an early console drawn on Coreboot's framebuffer. Once the inteldrm driver loads, it will take over as the framebuffer provider. Accelerated X is handled through Xorg's modeset driver, as OpenBSD's Broadwell support is not 100% and using the xorg-video-intel driver can display a corrupted screen. Backlight can be adjusted with wsconsctl display.brightness. |
| Wireless | Yes | The Intel 7260 802.11n wireless card is supported by the iwn driver. |